Retro Calculator
The Retro Calculator feature allows you to make corrections to transactions or pay policies in previous pay periods. Adjustments in pay can then be calculated.
To add a new Retro Calculator job, complete the following steps.
-
Navigate to .
-
Under Actions, click Add.
-
Update the fields for this Retro Calculator job:
-
Code: The unique name to identify this Retro Calculator job.
-
Retro Job Start Date: The first day (in a previous, closed pay period) that your corrected data is needed.
-
Expedited: Set to Yes if the retro job is to be expedited or No if it is standard.
When employees request that payment errors from a previous pay period be fixed, they can decide whether the adjustments should be paid right away (expedited) or added to the next scheduled paycheck (standard).
Note
If you use the Expedited option (set to Yes), you must contact symplr Customer Support for help with required updates to your payroll interface file. Without this assistance and the updates to the payroll interface file, the Expedited feature will not work.
-
Expedited Payment Destination: This only appears when the Expedited field is set to Yes. Here you select the method or location of payment. For example, if the employee decides to be paid right away, you can select the method or location, such as being paid via direct deposit or with a check to be picked up at a specified location.
-
Reason or Predefined Reason: The reason this Retro Calculator job is being created.
The field you see (Reason or Predefined Reason) depends on how the following indicator is set:
-
N - Predefined notes are not used when creating retro jobs (default)
-
O - Predefined notes are optional when creating retro jobs
-
R - Predefined notes are required when creating retro jobs
When set to N, the free-form Reason field is available. When set to O or R, the Predefined Reason field is available for you to pick from a list of options.
-
-
-
Click Save.
After saving, the new Retro Calculator job is shown on the General screen. It shows the fields you configured in step 3 along with these additional fields:
-
Created By: This is the name of the person who created this Retro Calculator job.
-
Status: This field shows the status of the Retro Calculator job.
-
Creation Date and Creation Time: The date and time the Retro Calculator job was created in the system.
- Completion Date and Completion Time: When a Retro Calculator job is finished, the completion date and time are automatically saved.
-
-
After creating the Retro Calculator job, add employees to the job.
These are the employees whose data in past pay periods needs to be corrected.
-
Under Actions, click Add.
-
Search for the desired employees.
You can search by any combination of Last Name, First Name, and employee Code. You can also search using other parameters by clicking the Advanced button.
-
Select all the applicable employees and then click a plus symbol.
When an employee is added, their data is automatically transferred from the historical database and a previous pay period calculation request is submitted, and they appear in the job's list. For information about the data and available actions, see Employees.
Click
 to open the employee's TCS (Time Card Screen). From there, you can work with the employee's transactions, as needed. Then under Employee Sections, you can click the Retro Jobs button to continue with the employee's Retro Calculator job without having to return to the full Retro Calculator screen.
To return to the General screen of the Retro Calculator job, click General under Retro Job Sections.
-
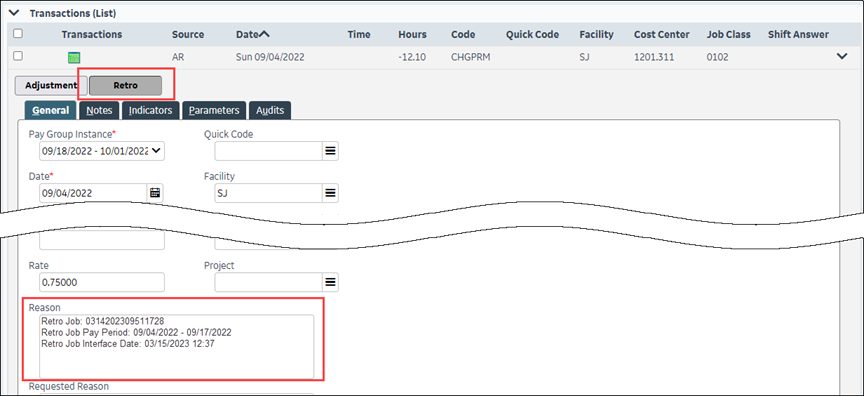
After completing the Retro Calculator job, the adjustment is ready to be added to an interface file.
Once the adjustment is added to an interface file, the date of the file is shown in the adjustment's Reason field on the employee's TCS, and the adjustment becomes read-only.
When searching for an existing Retro Calculator job, keep these things in mind:
-
You can search by the fields described above in steps 3 and 4 of Add a new Retro Calculator job.
In addition to those fields, you can search by:
-
Ready to Complete
This field helps you identify which retro jobs can be completed.
-
Current Pay Period Date Range
-
Organization units
You can search down to the organization level where pay groups are defined at, which is normally the trunk level. Use this in conjunction with the Current Pay Period Date Range field to find retro jobs in a certain pay group instance.
-
Date ranges for retro job date, creation date, and completion date.
With date ranges, you can, for example, search for a Retro Calculator job that was completed last month without knowing the actual completion date. You can enter the earliest and latest probable dates to do your search.
-
-
You can adjust which columns you see in your search results. For example, you can decide whether you want to see the Reason column or remove the Reason column and replace it with the Predefined Reason column, if you are using predefined reasons instead. To do so, navigate to . As needed, drag the column options to or from the Selected Columns box and click Save.
-
If you want to search for a keyword in the Reason field, use regular expressions. For information, see Using Regular Expressions for Searching.
Under Actions, the following buttons are available:
-
Calculate allows you to calculate all the employees in the Retro Calculator job. Employees can also be calculated individually or as a group on the Employees page.
-
Delete Selected will remove the selected Retro Calculator jobs and cancel all actions taken in the jobs.
A job containing any employees who were successfully processed cannot be deleted.
-
Complete Selected allows you to finalize and finish the selected Retro Calculator jobs. This last step is done after all pay period edits are made, employees are calculated and handled, and reports viewed to verify results.
-
Reset Selected allows you to reset the selected Retro Calculator jobs. This is done after a failure when you need to start over to try to Complete again.
-
Storage Volume allows you to choose the storage volume that the selected, updated Retro Calculator jobs apply to.
If the Retro Calculator job fails, you can remove the employees who are causing the failure and roll back their transactions, and then continue to process the remaining records in the job. To remove the employees with errors, complete the following steps.
-
Under Retro Job Sections, click General.
-
Under Actions, click Reset Retro Job.
-
Under Retro Job Sections, click Employees.
-
Select the employees with errors and click Delete.
See the Completed column.
-
An exclamation point in the Completed column indicates the employee has an error and that the employee did not get processed in the Retro Calculator job. Hover over the exclamation point to see the type of error.
-
A checkmark in the Completed column indicates the employee was processed successfully in the Retro Calculator job. Employees who were processed successfully cannot be edited or deleted from a job.
The deleted employees' recalculated transactions are rolled back to their original state.
-
-
Click General and then under Actions, click Complete to finish the Retro Calculator job.
Related topics